


The 4 Critical Stages of the Roasting Curve Every Roaster Must Master
A roast can fail long before the beans look wrong.
By the time coffee reaches the cooling tray, the flavor path has already been set by dozens of small thermal decisions. Too much heat early can seal the outside of the bean while moisture remains trapped inside. Too little energy through browning can leave the cup flat. A poor response at first crack can send the roast into a stall, spike, or baked finish. A few extra seconds in development can turn sweetness into bitterness.
That is why the roasting curve matters. It is not just a line on software. It is the record of how heat, time, moisture, pressure, chemistry, and structure interact inside the bean.
A roast profile is usually divided into four main stages:
Drying
Maillard or browning
First crack
Development after first crack
Each stage has a clear purpose. Each one also creates effects that cannot be fully undone later. Skilled roasting comes from knowing what should happen in each phase, then controlling the machine with enough precision to repeat the result. Automated control systems, such as those used in Rostino roasters, help by giving the roaster tighter control over charge temperature, turnaround behavior, heat application, and critical reaction points.

The roasting curve is a sequence, not a collection of separate steps
A common mistake is treating each roasting phase as if it stands alone. In reality, every stage prepares the next one.
If drying is rushed, the Maillard phase may start with uneven moisture inside the seed. If browning is too short, development may not have enough flavor structure to finish well. If first crack is mishandled, the final cup may taste sharp, smoky, dull, or bitter, even if the end temperature looks acceptable.
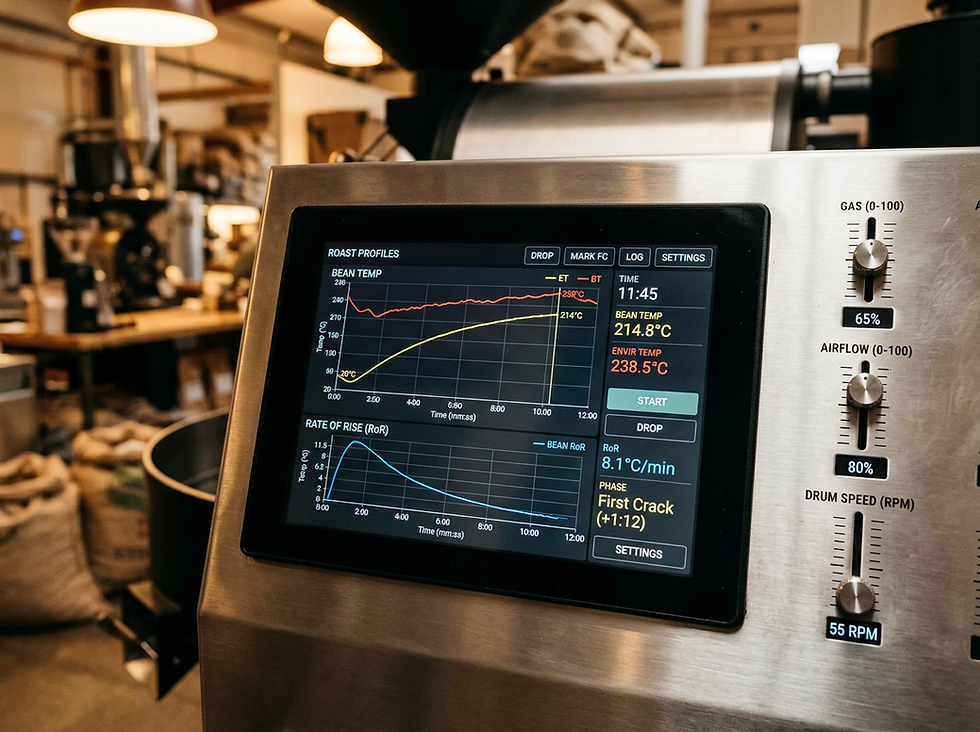
The roasting curve gives shape to this chain of events. It tracks how bean temperature changes over time and helps the roaster understand whether energy is building, falling, or moving in the wrong direction.
Here is a simple overview of the four stages.
Stage | Typical range | Main purpose | Main risk |
Drying | Charge to about 160°C, 320°F | Remove internal moisture | Grassy or flat flavors |
Maillard or browning | About 160°C to first crack | Build sweetness, color, and aroma | Thin, sour, or uneven flavor |
First crack | Around 200°C to 205°C, 392°F to 401°F | Release pressure and shift bean structure | Heat spike, crash, or uneven expansion |
Development | First crack to drop | Finish sweetness, body, and roast degree | Underdeveloped or overdeveloped cup |
The numbers are useful guides, not universal laws. Bean density, moisture, batch size, airflow, drum speed, probe placement, and roaster design all affect how the curve behaves. Still, the four-stage structure gives every roaster a practical way to diagnose flavor.
Stage 1 uses heat to remove moisture without damaging the bean
The drying phase starts at charge, when green coffee enters the roaster, and runs until the beans reach roughly 160°C, or 320°F. At this point, the coffee is still absorbing heat. This makes drying an endothermic phase, meaning the beans take in energy from the roasting environment.
Green coffee usually contains about 10% to 12% moisture by weight. That moisture must leave the bean before the main browning reactions can progress properly. The goal sounds simple, but the margin for error is small.
The roaster needs enough heat to drive moisture out efficiently. At the same time, the heat must be gentle enough to avoid damaging the surface before the inside has warmed through.
If drying runs too fast, the outside of the bean can heat aggressively while moisture remains trapped inside. This can lead to flavors often described as:
Green
Grassy
Vegetal
Raw
Astringent
If drying runs too slowly, the roast may lose momentum. The cup can become:
Flat
Dull
Muted
Heavy without sweetness
The best drying phase builds energy without shocking the coffee. It sets the foundation for even heat transfer during the rest of the roast.
Charge temperature sets the starting point
Charge temperature is one of the first major decisions in a roast. It describes the temperature of the roaster before the green coffee enters. A dense, high-grown coffee may need a different starting approach than a lower-density coffee. A larger batch behaves differently from a smaller batch.
Once the coffee enters the drum, the bean temperature reading usually drops before it begins to rise again. The low point is known as the turnaround temperature. This point helps the roaster understand how the batch is absorbing heat at the start.
In a Rostino roaster, digital control over charge temperature and turnaround behavior helps create a more repeatable beginning. That matters because a messy start forces the roaster to compensate later, and compensation rarely produces the same clarity as a clean curve from the beginning.
Stage 2 builds sweetness, aroma, and brown color
The Maillard phase, often called the browning phase, typically begins around 160°C, or 320°F, and continues until the start of first crack, often around 200°C, or 392°F.
This is where much of the coffee’s flavor identity begins to form. The beans shift from yellow and hay-like to tan, then brown. Aromas move from grassy to bread-like, nutty, sweet, and increasingly complex.
During this phase, amino acids and reducing sugars react through Maillard reactions. Caramelization also begins to contribute as the roast progresses. The result is the development of compounds that can show up in the cup as:
Chocolate
Toasted nuts
Caramel
Baking spices
Brown sugar
Dried fruit
Warm bread
This part of the roast also helps shape acidity. A very short browning phase can leave acidity feeling sharp or disconnected. A longer and well-managed Maillard phase can round that acidity and build more perceived sweetness.
The key is not simply making this stage longer. The key is controlling heat so the coffee continues to progress with balance.
Even heat distribution protects batch consistency
During browning, the whole batch needs to move as one. If some beans receive more conductive heat than others, the roast can develop unevenly. One bean may reach strong brown-sugar notes while another tastes green or papery.
A double-wall drum helps reduce harsh direct heat and improves thermal consistency. The benefit is not just visual uniformity. It affects flavor uniformity inside the cup. When beans develop at a similar rate, the finished batch has a cleaner and more coherent profile.
This is where machine design and control become especially important. The roaster is not only applying heat. The roaster is managing how that heat reaches the bean surface, moves inward, and supports chemical change.

Stage 3 marks the pressure release of first crack
First crack is one of the most important moments in roasting. It usually begins around 200°C to 205°C, or about 392°F to 401°F, depending on the coffee and the roasting system.
Up to this point, the beans have been absorbing heat. As pressure builds inside the cellular structure, water vapor and gases expand. When the bean structure can no longer contain that pressure, it fractures. The result is the audible popping sound known as first crack.
This moment marks a major physical and thermal shift. The bean expands, its structure opens, and the roast changes from mainly endothermic behavior to a brief exothermic phase, where the bean releases stored energy.
First crack is not just a sound cue. It is a turning point in the curve.
If the roaster keeps applying the same amount of heat through the start of first crack, the batch may gain energy too quickly. This can push the roast past the intended flavor target and mute origin character.
If the roaster cuts heat too aggressively, the rate of rise may crash. The roast can stall during a stage when the coffee needs controlled forward movement. That often leads to baked flavors, where sweetness fades and the cup tastes dry, hollow, or bread-like in a dull way.
A good first crack response balances control and momentum. The heat input often needs to be reduced before or during first crack, but not so much that the roast loses direction.
Automation helps when timing becomes critical
First crack demands fast judgment. The roaster needs to observe sound, smell, bean color, rate of rise, exhaust behavior, and elapsed time at once. In manual roasting, the response depends heavily on experience and attention.
Automated control in a Rostino system can support this moment by detecting critical changes through sensors and adjusting the burner to avoid unwanted heat buildup. That does not remove the role of the roaster. It gives the roaster a more stable control environment, especially when repeating a profile across multiple batches.
The goal is not to make every coffee taste the same. The goal is to make intentional decisions repeatable.
Stage 4 decides whether the roast tastes complete
Development begins at first crack and ends when the coffee is dropped into the cooling tray. This stage is often measured as development time and as a percentage of total roast time.
A common target range is about 18% to 25% of the total roast duration, though this varies by coffee, roast style, and desired cup profile. A bright filter roast may sit toward the lower end. A more developed espresso profile may need more time after first crack to build body and reduce sharpness.
Development is where the roaster finishes the work started earlier. Sugars continue to transform. Acidity becomes more rounded. Body increases. The final roast degree becomes clear.
This stage is also the least forgiving.
Short development can leave the cup raw
If the coffee is dropped too soon after first crack, the roast may taste underdeveloped. The beans may show a rough surface and the cup may feel incomplete.
Common signs include:
Harsh acidity
Raw or cereal-like flavor
Thin body
Grassy aftertaste
Sweetness that never fully appears
Underdevelopment does not always mean the coffee was roasted light. A coffee can reach a light color and still taste complete if the roast curve was managed well. The problem is not lightness itself. The problem is insufficient internal development.
Long development can bury the coffee’s identity
If development runs too long, sweetness can turn into bitterness. The cup may lose the fruit, florals, or delicate acidity that made the coffee special.
Common signs include:
Heavy bitterness
Charred or smoky flavor
Dry finish
Loss of origin character
Flat sweetness
In darker roasting, the line between rich and burnt can be thin. Controlled development helps build body without letting carbon-like flavors dominate the cup.
A strong roast profile connects taste to control
The best roasting curve is not the prettiest one on a screen. It is the one that produces the intended flavor in the cup and can be repeated with confidence.
That means every stage should answer a clear question.
During drying, did the roast remove moisture cleanly without scorching or stalling?
During Maillard, did the coffee build sweetness, aroma, and color evenly?
During first crack, did the roast respond to the release of energy without a spike or crash?
During development, did the coffee finish with balance, body, and clarity?
When the answer is yes, the curve becomes more than a graph. It becomes a recipe for flavor.
Rostino’s automated control system supports this work by helping the roaster manage heat with precision at the moments that matter most. Charge temperature, turnaround behavior, burner response, and first crack control all become easier to repeat. That consistency gives the roaster more room to focus on taste, roast intention, and green coffee character.
Mastering the four stages of the roasting curve does not mean forcing every coffee into one profile. It means understanding what each coffee needs at each point in the roast. Once those stages become clear, better roasting becomes less about guessing and more about guiding the bean from moisture to sweetness, from pressure to structure, and from raw potential to a finished cup.


Comments